


Equipment
- OCT CATHETER: contains rotating optical fiber with a lens and refractor element.
- REFLECTOR ELEMENT: focuses the beam and directs it into the vessel wall.
- MOTOR UNIT: connects catheter to a rotary junction and rotates the fiber.
- IMAGING PROBES:
- TD-OCT imaging probes: contain single mode fiberoptic core within a translucent sheath with maximal outer diameter of 0.019 inches.
- FD-OCT imaging probes: integrated in a short monorail catheter comparable to conventional 0.014 inch angioplasty guidewire.
- OCT CONSOLE: detection of reflected light signal and conversion into digital signals.
- Console is used to control rotational and pullback speed of the catheter.
- Performs calibration prior to each OCT image acquisition and allows adjustment of the Z-offset in order to allow variation in the optical path length of the optical fiber to avoid errors in OCT measurements.
OPTIS
OPTIS Angio Co-Registration Module – allows user to visualize linkage between anatomic OCT image data on angiography image.
INTEGRATED System –fully integrated cath lab OCT and FFR system that provides physicians with increased control and ease of use with angio co-registration.
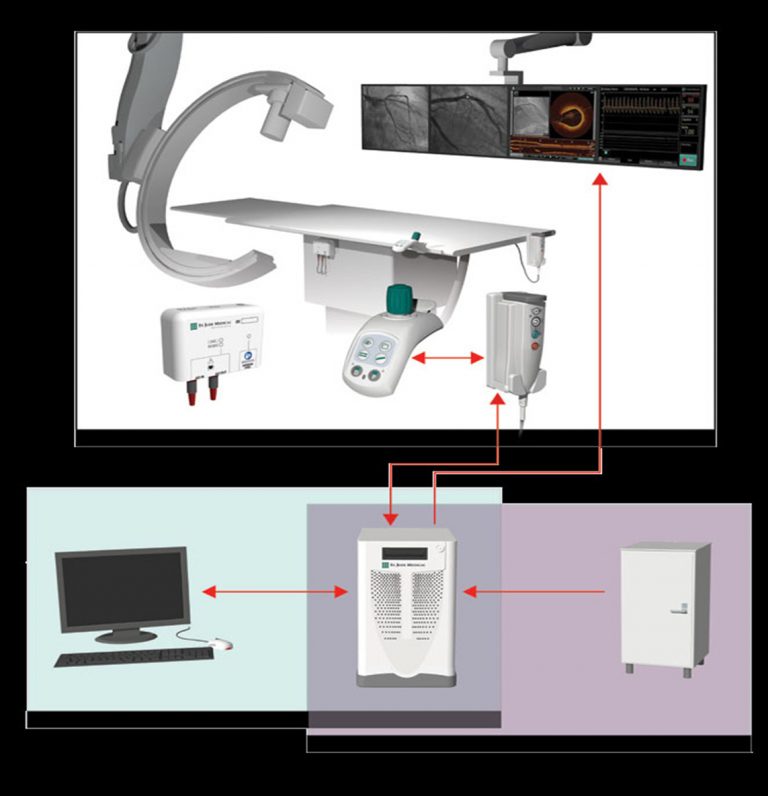
OPTIS
MOBILE System- combines OCT and FFR on a mobile system for seamless integration into multiple cath labs.
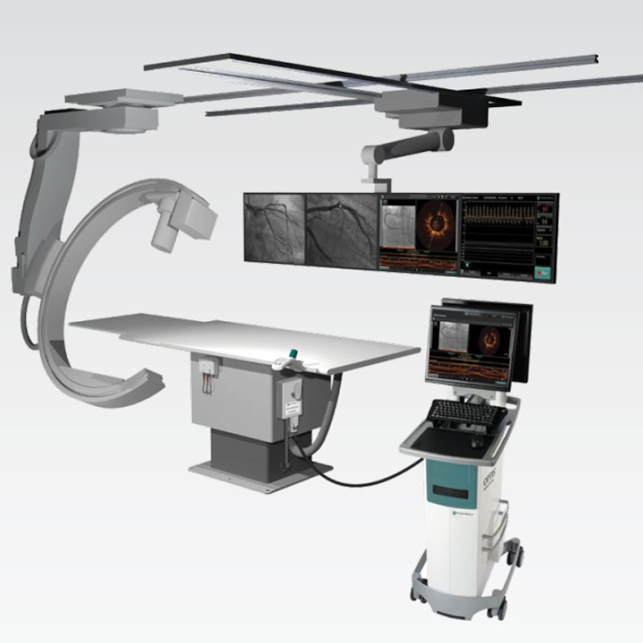
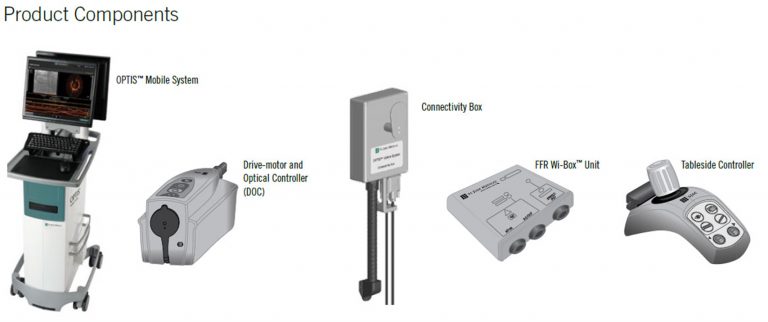
Image Acquisition: A Step By Step Approach
- SYSTEMIC ANTICOAGULATION: with heparin prior to guidewire insertion into vessel.
- INTRACORONARY NITROGLYCERIN: to avoid catheter induced vasospasm.
- OCT is INDICATED in vessels 2.0 – 3.5 mm in diameter.
- USE CAUTION IF:
- Severe left ventricular dysfunction
- Renal impairment
- Single remaining vessel
- Contrast Allergy
- BLOOD CLEARING: needed during image acquisition as infrared light cannot penetrate blood.
*For vessels with near complete stenosis or total occlusion, it is recommended that the blood flow be restored prior to OCT so that the contrast media can adequately clear from the artery.
A STEP BY STEP APPROACH:
- Patient should receive systemic anticoagulation with heparin or bivalirudin with an ACT>250 sec.
- Conventional guiding catheters and 0.014’’ intracoronary guidewire can be used to cross the target lesion.
- The monorail rapid exchange OCT catheter is compatible with a ≥6Fr guiding catheter.
- Open the OCT catheter from the package and flush the OCT catheter with the attached 3 cc syringe using 100% contrast. Make certain all the air has been purged from the catheter.
- Connect the catheter to the controller unit and administer 200 µg of intracoronary nitroglycerin.
- Backload the guidewire through the OCT catheter and advance the distal tip of the catheter past the region of interest.
- Pullback may be performed manually or automatically (10-40 mm/sec) with simultaneous injection of contrast though the guiding catheter with a pre-set infusion rate of 2-4 mL/sec.
- If Automatic Pullback: Set the power injector according to the manufacturer’s instructions (typically at least 3cc/sec for a total volume of 12 cc for RCA and 4 cc/sec for a total volume of 14 cc for left coronary with no more than 450 PSI).
- Check catheter position with a test injection.
- Activate imaging catheter and injection 100% contrast.
- Assess acquired images and if clear and adequate then the OCT catheter may be removed.
OCT Display Overview
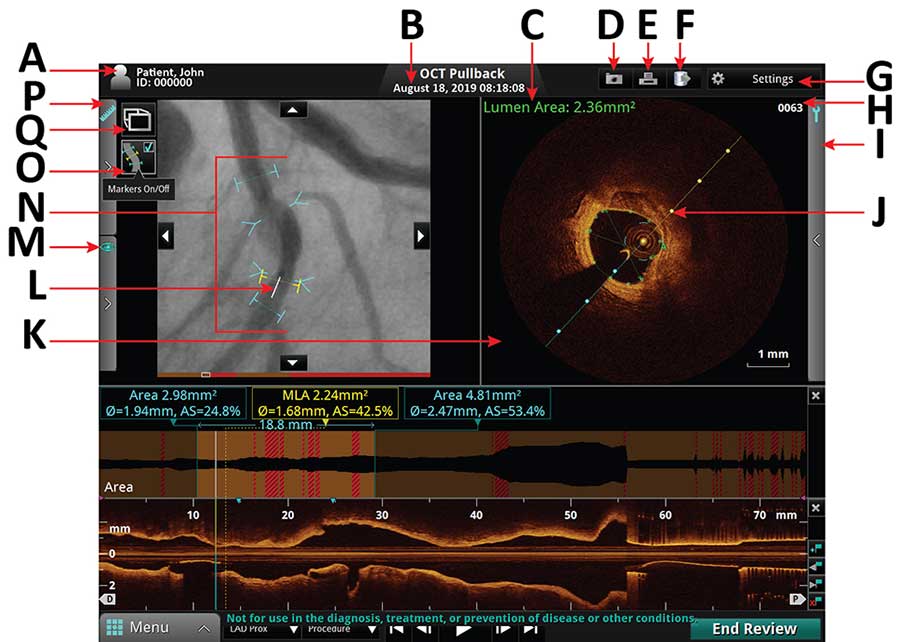
Figure I. Labeled patient information, toolbar, coronary angiography and cross sectional OCT image retrieved during a routine OCT pullback. Click on the letter to see the display function.
- A Patient name and ID.
- B Recording date and time.
- C Lumen Contour Measurements: Displays either Mean Diameter or Area of the cross section.
- D Capture button: Available on a still frame or paused recording.
- E Print button: Available when a USB drive is connected and the system is displaying a still frame or paused recording.
- F Export button: Click to open the Export Wizard.
- G Settings button: Click to open the (Playback) Settings menu.
- H Frame number: Only visible on a paused recording when Tool Panel is closed.
- I Tool Panel containing Measurement and Annotation tools: Use these to add measurements, calculations, and add text to recordings and still images.
- J Cut-Plane Indicator: The cut-plane is shown as a solid line in the cross-sectional view. Click and drag this to change the lateral view shown in the L-Mode display.
- K Image Window: A cross-sectional view of the current location of the pullback.
- L OCT Frame Indicator (Angio Co-Registration view): Representation in the Angiography Window of the L-Mode Current Frame Indicator.
- M View Menu: Includes the Advanced Display, Lumen Profile and Rendered Stent submenus.
- N Stent Roadmap: This group of markers comprises the Proximal Marker, Distal Marker, MLA Marker, and Bookmarks
- O Markers On/Off Button: Click to turn on and off all indicators in Ango Co-Registration view with the exception of the OCT Frame Indicator.
- P Measurements Menu: This section lists measurements from the current image; click on a measurement to highlight it in the Image Window.
- Q View Mode (all advanced display views): Click to toggle between Window mode (shown above) and Full Screen Mode. Also available as a button on the Table side Controller.
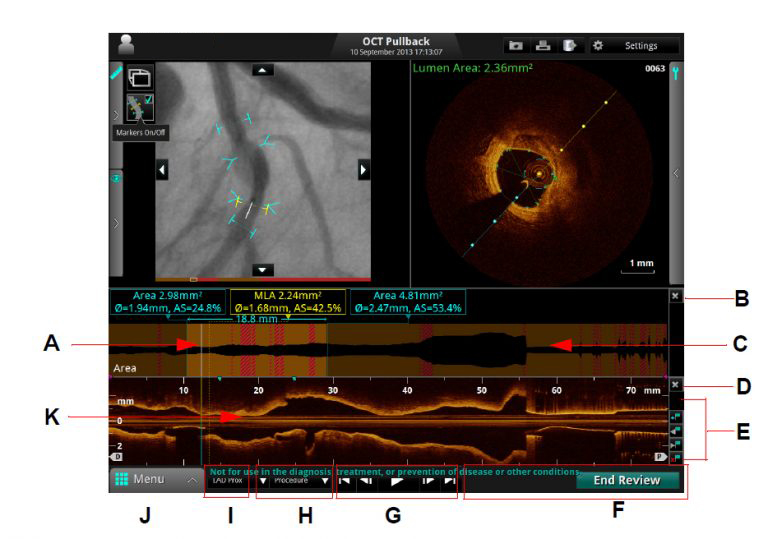
Figure II. Labeled longitudinal OCT image and play function toolbar retrieved during a routine OCT pullback. Click on the letter to see the display function.
- A Current Frame Indicator (L-Mode View): Click and drag to change the frame shown.
- B Lumen Profile View Close Box: Click this to close the Lumen Profile view.
- C Lumen Profile: Displays the lumen profile as either a diameter graph or an area graph.
- D L-Mode View Close Box: Click this to close the L-Mode view.
- E Bookmark controls: Add or remove bookmarks to the L-Mode view.
- F End Review: Click the End Review button to close this window and return to the Patient Summary menu.
- G Playback controls: Control the playback of the OCT recording. Not available with still images.
- H Procedure list: Click to open a drop-down list of procedures to describe this recording.
- I Vessel list: Click to open a drop-down list of vessels to describe this recording.
- J Menu: Displays the context-sensitive menu. Click to access the Setup and playback Calibration controls.
- K L-Mode view: An approximate lateral representation of the vessel for this recording. Not available with still images.
